背包系统
物品属性的基本设置
使用MVC架构来控制数据控制和显示
因此需要定义相关的物品内容的类和物品类型的枚举变量
1
2
3
4
5
6
|
public enum ItemType
{
    Seed, Commodity, Furniture,
    HoeTool, ChopTool, BreakTool, ReapTool, WaterTool, CollectTool,
    ReapableScenery
}
|
 1
 2
 3
 4
 5
 6
 7
 8
 9
10
11
12
13
14
15
16
17
18
19
20
21
|
// DataCollections.cs
/// <summary>
/// 该类收集写过的所有类,结构体,
/// </summary>
[System.Serializable] // 保证写过的所有类和结构体都能被Unity识别,因此需要为其序列化
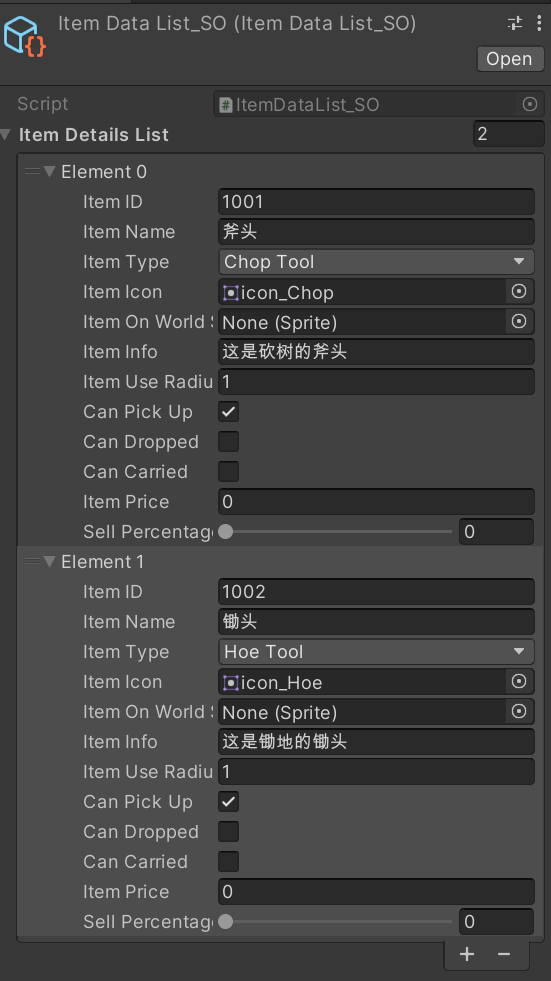
public class ItemDetails
{
public int itemID;
public string itemName;
public ItemType itemType;
public Sprite itemIcon; // 物品的图标
public Sprite itemOnWorldSprite; // 在世界地图上物品的样子,比如种子
public int itemUseRadius; // 物品的可适用范围
public bool canPickUp;
public bool canDropped;
public bool canCarried;
public int itemPrice;
[Range(0, 1)]
public float sellPercentage; // 售卖时候的折扣范围
}
|
在两个类的基础上,可以通过定义对应的ScriptableObeject来定义我们的物品信息,由于物品较多,因此在SO中可以通过一个列表的形式去定义多个物品信息
1
2
3
4
5
|
[CreateAssetMenu(fileName = "ItemDataList_SO", menuName = "Inventory/ItemDetails")]
public class ItemDataList_SO : ScriptableObject
{
    public List<ItemDetails> itemDetailsList;
}
|
UIToolKit可以帮我们定义一个可视化的编辑内容的方案
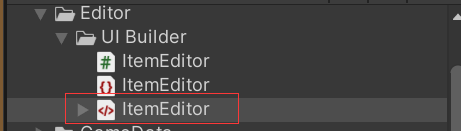
新建一个Editor文件夹用于管理我们的所有可编辑内容,在下面建立存放UItoolkit的文件夹UI Builder,然后新建一个Uitoolkit -> Editor window,分为三个文件,用于管理GUI的脚本,Unity独特的XML格式文件,以及一个类似CSS的内容。
每一个UitoolKit的窗口都有一个根节点
 1
 2
 3
 4
 5
 6
 7
 8
 9
10
11
12
13
14
15
16
17
18
19
20
21
22
23
24
25
26
27
28
29
30
31
|
public class ItemEditor : EditorWindow
{
    [MenuItem("Window/UI Toolkit/ItemEditor")]
    public static void ShowExample()
    {
        ItemEditor wnd = GetWindow<ItemEditor>();
        wnd.titleContent = new GUIContent("ItemEditor");
    }

    public void CreateGUI()
    {
        // Each editor window contains a root VisualElement object
        VisualElement root = rootVisualElement;

        // VisualElements objects can contain other VisualElement following a tree hierarchy.
        VisualElement label = new Label("Hello World! From C#");
        root.Add(label);

        // Import UXML
        var visualTree = AssetDatabase.LoadAssetAtPath<VisualTreeAsset>("Assets/Editor/UI Builder/ItemEditor.uxml");
        VisualElement labelFromUXML = visualTree.Instantiate();
        root.Add(labelFromUXML);

        // A stylesheet can be added to a VisualElement.
        // The style will be applied to the VisualElement and all of its children.
        var styleSheet = AssetDatabase.LoadAssetAtPath<StyleSheet>("Assets/Editor/UI Builder/ItemEditor.uss");
        VisualElement labelWithStyle = new Label("Hello World! With Style");
        labelWithStyle.styleSheets.Add(styleSheet);
        root.Add(labelWithStyle);
    }
}
|
绘制可视化的编辑工具
直接使用对应的UiBuilder,作为编辑窗口,可视化的编辑我们的UI ToolKit
在UI builder中,每一个VisualElement可以看做是一个div
和写页面类似
在ItemUI的界面中将所有ItemData数据通过代码进行加载,并
 1
 2
 3
 4
 5
 6
 7
 8
 9
10
11
12
13
14
15
16
17
18
19
20
21
22
23
|
public class ItemEditor : EditorWindow
{
    private ItemDataList_SO _dataBase;
    private List<ItemDetails> _itemDetailsList = new List<ItemDetails>();   // 用于获得对应列表的内容
    /// <summary>
    /// 从Asset文件夹下找出我们的ItemDataList_SO,并加载当GUI中
    /// </summary>
    private void LoadDataBase()
    {
        // 通过类似的名称找出其对应的GUID数组
        var dataStringArrs = AssetDatabase.FindAssets("t:ItemDataList_SO");	// t:用于指定我们要找到文件的类型,可以不写
        if (dataStringArrs.Length > 0)
        {
            // 基于数组中的路径找出我们需要的Item数据类型
            var path = AssetDatabase.GUIDToAssetPath(dataStringArrs[0]);
            _dataBase = AssetDatabase.LoadAssetAtPath<ItemDataList_SO>(path);
        }
        _itemDetailsList = _dataBase.itemDetailsList;

        // 必须标注了才能保存数据
        EditorUtility.SetDirty(_dataBase);
    }
}
|
每次获得数据,由于界面已经加载,因此需要将数据设置为脏数据,才能表示重新加载了数据
将获得的itemList的数据显示在左侧的ListView界面上
获得界面上的ListView组件内容,然后将该组件的通过Unity自带的代码进行显示
 1
 2
 3
 4
 5
 6
 7
 8
 9
10
11
12
13
14
15
16
17
18
19
20
21
22
23
24
25
26
27
28
29
30
31
32
33
34
35
36
37
38
39
40
41
42
43
44
45
46
47
48
49
50
51
52
|
public class ItemEditor : EditorWindow
{
    private ListView _itemListView;
    public void CreateGUI()
    {
        // 获得模板数据
        // 通过绝对路径找到我们的模板
        _itemRowTemplate =
            AssetDatabase.LoadAssetAtPath<VisualTreeAsset>("Assets/Editor/UI Builder/ItemRowTemplate.uxml");
        // 获得listView
        _itemListView = root.Q<VisualElement>("container").Q<VisualElement>("ItemList").Q<ListView>("ListView");
        // 在ListView中显示数据
        GenerateListView();

    }


     /// <summary>
    /// 生成ListView相关内容
    /// </summary>
    private void GenerateListView()
    {
        // 告诉界面每个item应该是什么样子的
        Func<VisualElement> makeItem = () => _itemRowTemplate.CloneTree();
        // 告诉界面每个item的内容该用什么去匹配 (element表示一个具体的组件,index表示当前组件的下标)
        Action<VisualElement, int> bindItem = (element, index) =>
        {
            if (index < _dataBase.itemDetailsList.Count)
            {
                var item = _itemDetailsList[index];
                // 通过Q<type>(name) 来寻找每个item的具体内容
                if (item.itemIcon != null)
                    element.Q<VisualElement>("Icon").style.backgroundImage = _itemDetailsList[index].itemIcon.texture;

                element.Q<Label>("ItemName").text = item.itemName != null ? item.itemName : "No Item";
            }
        };

        _itemListView.fixedItemHeight = 60;     // 固定高度
        _itemListView.makeItem += makeItem;
        _itemListView.bindItem += bindItem;
        _itemListView.itemsSource = _itemDetailsList;

        // Callback invoked when the user double clicks an item
        _itemListView.onItemsChosen += Debug.Log;

// Callback invoked when the user changes the selection inside the ListView
        _itemListView.onSelectionChange += Debug.Log;


    }
}
|
将数据信息于右侧的具体数值进行显示
为了保证在面板上修改的值能够同步到具体的data_SO中,需要使用专门的函数,设置为脏函数
在这一过程,主要是需要通过Q<type>(name)去找出所有的组件内容,然后面板信息绑定从itemList中得到的值
因此首先需要在每次选择某一个item时获得对应的内容OnSelecttionChange事件,然后将其内容同步到右侧面板上
_itemListView.onSelectionChange += OnListSelectionChange;
每次绑定好一个item和对应的面板后需要同时为其绑定对应的回调函数,保证能及时同步到SO上
 1
 2
 3
 4
 5
 6
 7
 8
 9
10
11
12
13
|
/// <summary>
    /// 当选中某一个item的时候的回调
    /// </summary>
    /// <param name="selectedItem">所有被选中的item,实际只有一个</param>
    private void OnListSelectionChange(IEnumerable<object> selectedItem)
    {
        if (selectedItem != null)
        {
            _activeItem = selectedItem.First() as ItemDetails;  // 强转
            GetItemDetails();
            _itemDetailsSection.visible = true;
        }
    }
|
 1
 2
 3
 4
 5
 6
 7
 8
 9
10
11
12
13
14
15
16
17
18
19
20
21
22
23
24
25
26
27
|
    /// <summary>
    /// 绑定item内容
    /// </summary>
    private void GetItemDetails()
    {
        // 设置了该函数面板中数据的更改 可以同步到SO中
        _itemDetailsSection.MarkDirtyRepaint();

        _itemDetailsSection.Q<IntegerField>("ItemID").value = _activeItem.itemID;
        // 回调函数,保证在面板上的修改能同步到我们的SO中
        _itemDetailsSection.Q<IntegerField>("ItemID").RegisterValueChangedCallback((evt) =>
        {
            _activeItem.itemID = evt.newValue;
        });

        // 获得Name
        _itemDetailsSection.Q<TextField>("ItemName").value = _activeItem.itemName;
        _itemDetailsSection.Q<TextField>("ItemName").RegisterValueChangedCallback(evt =>
        {
            _activeItem.itemName = evt.newValue;
            _itemListView.Rebuild();        // 当更新名称和图标的时候重新绘制
        });

        // 获得类型
        _itemDetailsSection.Q<EnumField>().value = _activeItem.itemType;

    }
|
更新图片icon
 1
 2
 3
 4
 5
 6
 7
 8
 9
10
11
12
|
// 实现图片的修改(思路:默认获得_activeItem的图片,如果需要修改图片,选择图片以后,修改显示图片的背景)
        _iconPreview.style.backgroundImage = _activeItem.itemIcon != null ? _activeItem.itemIcon.texture :_defaultIcon.texture;
        _itemDetailsSection.Q<ObjectField>("ItemIconSprite").value = _activeItem.itemIcon;
        _itemDetailsSection.Q<ObjectField>("ItemIconSprite").RegisterValueChangedCallback(evt =>
        {
            // 每次回调都需要更新
            Sprite newIcon = (Sprite)evt.newValue;
            _activeItem.itemIcon = newIcon;
            _iconPreview.style.backgroundImage = _activeItem.itemIcon != null ? newIcon.texture :_defaultIcon.texture;
            _itemListView.Rebuild();

        });
|
添加item和删除item
 1
 2
 3
 4
 5
 6
 7
 8
 9
10
11
12
13
14
15
16
17
18
19
20
21
22
23
24
25
26
27
28
29
30
31
32
33
|
// 在GUI主函数中为button添加对应的事件
// 获得添加和删除按钮的具体事件
public void CreateGUI()
{
    root.Q<Button>("AddButton").clicked += OnAddBtnClicked;
    root.Q<Button>("DelButton").clicked += OnDelBtnClicked;
}

//
# region 按键事件
    private void OnDelBtnClicked()
    {
        // 从_itemDetailsList中移除activeItem,然后重新绘制
        if (_activeItem != null)
        {
            _itemDetailsList.Remove(_activeItem);
            _itemListView.Rebuild();
            _itemDetailsSection.visible = false;
        }
    }

    private void OnAddBtnClicked()
    {
        _itemDetailsSection.visible = true;
        ItemDetails newItem = new ItemDetails();
        newItem.itemName = "New Item";
        newItem.itemID = 1000 + _itemDetailsList.Count;
        newItem.itemIcon = AssetDatabase.LoadAssetAtPath<Sprite>(Settings.DefaultIconPath);
        _itemDetailsList.Add(newItem);

        _itemListView.Rebuild();
    }
# endregion
|
注意绑定枚举类型时需要先将其初始化
1
2
3
4
5
6
|
_itemDetailsSection.Q<EnumField>("ItemType").Init(_activeItem.itemType);
_itemDetailsSection.Q<EnumField>("ItemType").value = _activeItem.itemType;
_itemDetailsSection.Q<EnumField>("ItemType").RegisterValueChangedCallback(evt =>
{
 _activeItem.itemType = (ItemType)evt.newValue;
});
|
物品管理逻辑
所有的物品都通过inventoryManager来控制
使用单例模式创建InventoryManage并构建对应的命名空间来管理需要的数据,所有跟背包、数据有关的内容都需要调用该命名空间,这样其他文件需要调用itemDataListSO的时候就需要先调用该命名空间using MFarm.Inventory
 1
 2
 3
 4
 5
 6
 7
 8
 9
10
11
12
13
14
15
|
// 添加一个命名空间,便于管理
namespace MFarm.Inventory
{
    public class InventoryManager : Singleton<InventoryManager>
    {
        // 获得数据的控制权
        public ItemDataList_SO itemDataListSo;
    }
    // 通过物品ID快速找到物品的details
    public ItemDetails GetItemDetails(int itemID)
    {
        return itemDataListSo.itemDetailsList.Find(i => i.itemID == itemID);
    }

}
|
每个场景的基础物体信息itemBase
该ItemBase用于加载所有在该场景中生成的物体(果实,种子,伐木产生的内容等),每当需要生产内容的
,就会去InventoryManager中找到对应的物品,然后每个物体需要有自己的sprite子物体
 1
 2
 3
 4
 5
 6
 7
 8
 9
10
11
12
13
14
15
16
17
18
19
20
21
22
23
24
25
26
27
28
29
30
31
32
33
34
35
36
37
38
39
40
41
42
43
44
45
46
|
namespace MFarm.Inventory
{
    public class Item : MonoBehaviour
    {
        public int itemID;

        private ItemDetails _itemDetails;
        private SpriteRenderer _spriteRenderer;
        private BoxCollider2D _boxCollider2D;

        private void Awake()
        {
            _spriteRenderer = GetComponentInChildren<SpriteRenderer>();
            _boxCollider2D = GetComponent<BoxCollider2D>();
        }

        private void Start()
        {
            if (itemID != 0)
                InitItem(itemID);
        }

        private void InitItem(int ID)
        {
            itemID = ID;
            _itemDetails = InventoryManager.Instance.GetItemDetails(itemID);
            Sprite itemSprite;
            if (_itemDetails != null)
            {
                itemSprite = _itemDetails.itemOnWorldSprite != null ? _itemDetails.itemOnWorldSprite : _itemDetails.itemIcon;
                _spriteRenderer.sprite = itemSprite;

                // 修改boxCollider的大小以匹配实际的图片尺寸
                Vector2 newSize = new Vector2(itemSprite.bounds.size.x,
                    itemSprite.bounds.size.y);

                _boxCollider2D.size = newSize;
                // 修改offset以匹配在底部的锚点
                _boxCollider2D.offset = new Vector2(0, itemSprite.bounds.center.y);

            }
        }


    }
}
|
人物的拾取逻辑
为player添加一个脚本,该脚本用于当触发器触发的时候获得item对应的内容,并将地图上的item删除
 1
 2
 3
 4
 5
 6
 7
 8
 9
10
11
12
13
14
15
16
17
18
19
20
21
22
23
24
25
26
27
28
29
30
31
32
33
34
35
|
namespace MFarm.Inventory
{
    public class ItemPickUp : MonoBehaviour
    {

        private void OnTriggerEnter2D(Collider2D other)
        {
            Item item = other.GetComponent<Item>();
            if (item != null)
                if (item.itemDetails.canPickedUp && Input.GetKeyDown(KeyCode.E))
                {
                    // 拾取到背包
                    InventoryManager.Instance.AddItem(item, true);
                }
        }

        private void OnTriggerStay2D(Collider2D other)
        {
            Item item = other.GetComponent<Item>();
            if (item != null)
                // OnTrigger和input,GetKeyDown的速率不匹配,一般来说是OnTrigger更新标志量,在update中触发按键
                if (item.itemDetails.canPickedUp && Input.GetKeyDown(KeyCode.E))
                {
                    // 拾取到背包
                    InventoryManager.Instance.AddItem(item, true);
                }
        }

        private void OnTriggerExit2D(Collider2D other)
        {

        }
    }

}
|
1
|
// OnTrigger和input,GetKeyDown的速率不匹配,一般来说是OnTrigger更新标志量,在update中触发按键
|
背包数据结构
为背包和背包内容数据单独记录一个数据类型,背包的内容数据只需要保存数据的ID和数量放在dataCollection中,构建一个新的struct ——InventoryItem
一般来说结构体类型都是值类型,每次生成对应内容时候都会为 成员变量赋值,因此不会出现当结构体或成员变量为空的情况。
在本例子中,为避免背包的数据为空引起的错误,因此我们将背包的每个数据都定义为一个struct
然后在为了适应多种存储物体的内容(背包,箱子,商店),我们需要新建一个新的SO——InventoryBag_SO文件,用于存储一段InventoryItem,这样我们只需要创建不同的so,就可以找出得到不同的存储的数据
1
2
3
4
5
|
[CreateAssetMenu(fileName = "InventoryBag_SO", menuName = "Inventory/InventoryBag")]
public class InventoryBag_SO : ScriptableObject
{
    public List<InventoryItem> inventoryItemList;
}
|
背包检查
需求
- 检查背包是否为空(通过检查在List中的每个item的数量是否为0)
- 检查背包是否已经有该物品(检查每个item的id是否为想要的ID)
 1
 2
 3
 4
 5
 6
 7
 8
 9
10
11
12
13
14
15
16
17
18
19
20
21
22
23
24
|
private bool AddItemInIndex(int itemID, int itemIndex, int amount)
        {

            if (itemIndex == -1)    // 如果背包没有当前物品
            {
                var newItem = new InventoryItem{itemID = itemID, itemAmount = amount};
                int vacancy = CheckBagCapacity();
                if (vacancy != -1)
                {
                    playerBag.inventoryItemList[vacancy] = newItem;
                    itemIndex = vacancy;
                }

            }
            else            // 如果有当前物品
            {
                var newAmount = playerBag.inventoryItemList[itemIndex].itemAmount + amount;
                var newItem = new InventoryItem() { itemID = itemID, itemAmount = newAmount };
                playerBag.inventoryItemList[itemIndex] = newItem;
            }

            // 返回是否已经将物体存放进入背包
            return itemIndex != -1;
        }
|
注意结构体的赋值不能直接赋值,需要通过重新初始化才行
绘制UI
建立一个新的场景,在新场景中新增一个Canvas用于存放UI面板,然后将该画布的Canvas Scaler改为适配屏幕大小
建议一组父物体 ,这组父物体用于作为真实UI工具的父物体,然后UI本身的内容需要在该物体下的子物体中进行实现。比如我们要完成一个快捷栏,则需要构建一个空物体Inventory然后再该物体下方构造UI组件Panel,将其作为快捷栏的具体组件。

同时将该Action Bar的图片设置为我们需要的ui的框架图片,并将image Type修改Slice
为了保证每个快捷栏的内容都是可以点击的,我们将每个快捷栏设置为一个button,每个button有自己的图片和内容,然后再在按钮中设置一个图片,用于显示具体的物品信息,一个Image用于显示被选中时的高亮狂。
在action Bar中添加组件Horizontal Layout Group组件,用于为所有UI内容分组,然后将对其方式设置为middle center,这样就可以对内部的所有内容按照分组管理,如果其中的部分组件希望受到管理,但是有个性化的设置,则需要为单独的组件添加Layout Element组件
绘制人物背包内UI
制作思路与普通的绘制UI相同
添加一个背包的panel -> 背包具体的内容有新的panel存放-> 每个物体都是一个单独的button -> 设置不同的image来显示不同的内容。
UI相关代码
在awake中获取组件也可能会导致update实时获取报错,因此为了效率,直接从Inspector组建中获得相关信息是最快的,因此对于一个private变量,通过[SerializeField]声明可以像public一样直接从Inspector获取内容
- 隐藏声明
[HideInInspector]
- 显示声明
[SerializeField]
1
2
3
4
5
|
[Header("组件获取")]
[SerializeField] private Image slotImg;
[SerializeField] private TextMeshProUGUI amountText;
[SerializeField] private Image slotHighLight;
[SerializeField] private Button btn;
|
通过这样的方式就可以保证其他类无法获取组件,但是可以在inspector中获取组件
对每个slot的内容进行更新,保证每个slot能获得对应的数据
 1
 2
 3
 4
 5
 6
 7
 8
 9
10
11
12
13
14
15
16
17
18
19
20
21
22
23
24
25
26
27
28
29
30
31
32
33
34
35
36
37
38
39
|
private void Start()
        {
            Debug.Log(slotItemDetails);
            isSelected = false;
            // 如果itemDetails声明为public则会被系统默认初始化
            if (slotItemDetails.itemID == 0)
            {
                UpdateEmptySlot();
            }
        }


        /// <summary>
        /// 更新格子UI和信息
        /// </summary>
        /// <param name="itemDetails">获得的物品</param>
        /// <param name="amount"></param>
        public void UpdateSlot(ItemDetails itemDetails, int amount)
        {
            slotItemDetails = itemDetails;
            slotImg.sprite = slotItemDetails.itemIcon;
            itemAmount = amount;
            amountText.text = itemAmount.ToString();
            btn.interactable = true;
            slotImg.enabled = true;
        }


        /// <summary>
        /// 如果当前格子的内容为空了(丢弃或卖出),则清空相关内容
        /// </summary>
        public void UpdateEmptySlot()
        {
            if (isSelected)
                isSelected = false;
            slotImg.enabled = false;
            amountText.text = string.Empty;
            btn.interactable = false;
        }
|
控制背包UI的显示
使用一个新的脚本InventoryUI来控制整个界面中的所有背包格子(当拾取物品时,能直接对背包格子进行处理的代码)
因此需要先创建一个管理每个格子信息的数组 ,
1
2
3
4
|
public class InventoryUI : MonoBehaviour
{
    [SerializeField] private SlotUI[] playerSlots;       // 控制角色所有能控制所有格子(背包和快捷栏)
}
|
同时将GameData中管理玩家背包的SO与这些数据进行绑定(因此需要为SlotUI.cs增加slotIndex,用于绑定数据)在slotUI.CS中添加public int slotIndex;然后具体的绑定函数,在inventoryUI.cs中填写
1
2
3
4
5
6
7
8
|
private void Start()
{
    // 在游戏运行的开始,将所有的数据进行绑定
    for (int i = 0; i < playerSlots.Length; i++)
    {
        playerSlots[i].slotIndex = i;
    }
}
|
由于更新UI的功能太过频繁使用,如果直接使用单例模式会导致耦合度太高,因此通过使用事件中心的模式,将所有需要更新UI的位置都注册该事件,每次更新都执行该事件
- 创建一个静态类,该类用于控制所有事件,包括事件本身的声明,和其调用
 1
 2
 3
 4
 5
 6
 7
 8
 9
10
11
12
13
|
// 该类是一个控制所有事件的静态类
public static class EventHandler
{
    // 我要知道每次需要更新UI的slot是哪里(玩家的背包?还是玩家的储物箱)
    public static event Action<InventoryLocation, List<InventoryItem>> UpdateInventoryUI;

    // 执行对应的更新函数
    public static void CallUpdateInventoryUI(InventoryLocation location, List<InventoryItem> items)
    {
        UpdateInventoryUI?.Invoke(location, items);
    }

}
|
- 在
InventoryUI.cs注册更新UI的事件(onEnable),并对事件函数进行具体的定义(描述)
 1
 2
 3
 4
 5
 6
 7
 8
 9
10
11
12
13
14
15
16
17
18
19
20
21
22
|
private void OnUpdateInventoryUI(InventoryLocation location, List<InventoryItem> items)
        {
            switch (location)
            {
                case InventoryLocation.Player:
                    for (int i = 0; i < playerSlots.Length; i++)
                    {
                        if (items[i].itemAmount > 0)
                        {
                            // 获得需要更新的物体的具体信息
                            var itemDetails = InventoryManager.Instance.GetItemDetails(items[i].itemID);
                            playerSlots[i].UpdateSlot(itemDetails, items[i].itemAmount);
                        }
                        else
                        {
                            playerSlots[i].UpdateEmptySlot();
                        }
                    }
                    break;

            }
        }
|
- 在
InventoryManager.cs的添加物品功能中调用静态类的事件调用函数,并传入对应的参数,保证事件能正常触发
1
2
3
|
// 更新UI
EventHandler.CallUpdateInventoryUI(InventoryLocation.Player, playerBag.inventoryItemList);
|
注意,由于在游戏一开始,玩家可能有具体的数据内容,因此需要在游戏的一开始就调用更新UI的事件,比如在inventoryManager中的start中进行能调用
控制背包的打开和关闭
控制背包打开与关闭主要通过控制背包的UI的active内容,因此需要一个对应go变量和bool变量,每次打开和关闭都是直接对该布尔值取反。
1
2
3
4
5
|
public void OpenBagUI()
{
    bagOpened = !bagOpened;
    bagUI.SetActive(bagOpened);
}
|
- 由于需要设置按键打开,因此需要设置为在update方法中检测按键
- 如果需要设置对应的button,则需要为其设置onclicked函数,
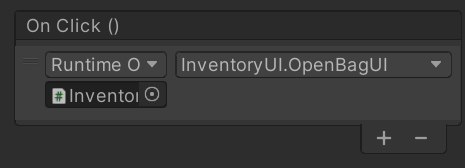
为其添加一个Onclick事件,其需要先选择执行的GO,然后选择该GO下对应的脚本
背包物品控制
设置点按格子高亮显示和动画
因此该代码需要在slotUI.cs中进行设置,由于Unity自带一个点击事件函数接口,因此可以直接调用该接口,用于知道当前内容是否已经被点击,或者点击了多少次:接口名:IPointerClickHandler,该函数内部有多种点击事件(单机,双击等),需要实现其内部的点击函数public void OnPointerClick(PointerEventData eventData)
1
2
3
4
5
6
|
public void OnPointerClick(PointerEventData eventData)
{
    if (itemAmount == 0) return;
    isSelected = !isSelected;
    slotHighLight.gameObject.SetActive(isSelected);  //
}
|
由于点击了以后,isSelected不会再变化,因此当点击多个按钮会有多个highlight标签,需要设置当点击其中一个的时候,从父级物体中关闭其他格子的isSelected。
因此我们在父物体的函数中设置slotHighlight的active,在inventoryUI.cs设置对应的函数
 1
 2
 3
 4
 5
 6
 7
 8
 9
10
11
12
13
14
15
16
|
public void UpdateSlotHighlight(int index)
{
    foreach (var slotUI in playerSlots)
    {
        if (slotUI.isSelected && index == slotUI.slotIndex)
        {
            slotUI.slotHighLight.gameObject.SetActive(true);
        }
        else
        {
            slotUI.isSelected = false;
            slotUI.slotHighLight.gameObject.SetActive(false);
        }

    }
}
|
在设置好该函数以后,在slotUI.cs中直接调用该函数即可
1
2
3
4
5
6
|
public void OnPointerClick(PointerEventData eventData)
{
    if (itemAmount == 0) return;
    isSelected = !isSelected;
    _inventoryUI.UpdateSlotHighlight(slotIndex);
}
|
注意_inventoryUI是通过直接获取属性的方式得到的private InventoryUI _inventoryUI => GetComponentInParent<InventoryUI>();
先创建动画的animator,然后为该slot的预制体设置一个动画控制器,在该动画控制器中创建一个animation,将预先定好的animation放入即可。
实现物体拖拽功能
实现拖拽功能的主要方式是通过调用三个Unity自带的接口IBeginDragHandle、IDragHandle、IEndDragHandler。分别用于处理拖拽开始,拖拽中和拖拽结束的时候情况。
而具体的拖拽过程将通过新定义一个拖拽图层,并在该图层上增加一个被拖拽的物品图片,当拖拽时生成该图片,并在拖拽过程中跟随鼠标的射线,在拖拽结束时根据拖拽事件的结束位置实现相应功能。
-
实现接口(在slotUI.cs中)
-
定义Drag图层
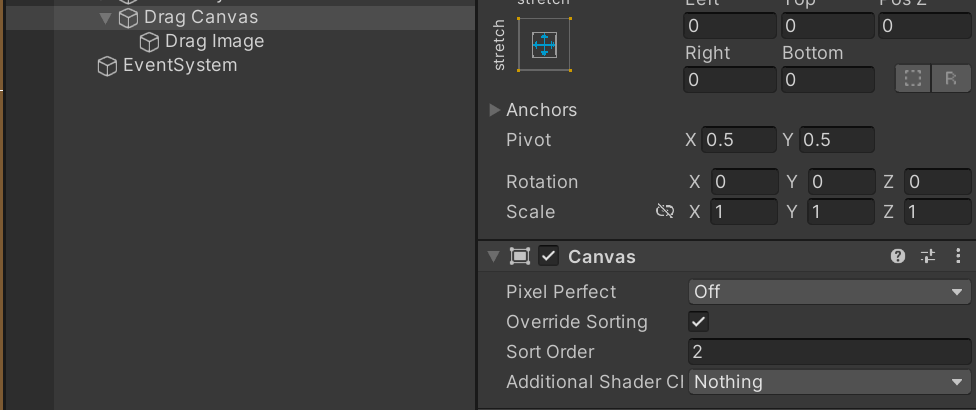
注意该图层需要设置与其他图层的关联为空,即不继承自主canvas,同时需要规定其排序结果,保证其内部的图片始终在原本的canvas上方
同时需要设置图片的Raycast Target 为空,即该图片不能被识别为光线检测的的目标,其目的是为了解决两个都可以被光线检测的图层发生重叠的时候,会导致鼠标识别不到后方的图片。
当Raycast Target为false,那么鼠标的射线会直接穿透该物体,从而到达后方。
- 在
InventoryUI.cs中获得拖拽图片,并在slotUI.cs的Drag方法中实现对图片的操作
 1
 2
 3
 4
 5
 6
 7
 8
 9
10
11
12
13
14
15
16
17
18
19
20
21
22
23
24
25
26
27
|
public void OnBeginDrag(PointerEventData eventData)
{
    if (itemAmount != 0)
    {
        // 初始设置,显示被拖拽的物品
        isSelected = !isSelected;
        inventoryUI.UpdateSlotHighlight(slotIndex);

        // 生成被拖拽的物品图片
        inventoryUI.dragImg.sprite = slotImg.sprite;
        inventoryUI.dragImg.SetNativeSize();        // 保证图片不失真
        inventoryUI.dragImg.enabled = true;
    }
}

public void OnDrag(PointerEventData eventData)
{
    // 被生成的图片始终跟随鼠标移动
    inventoryUI.dragImg.transform.position = Input.mousePosition;
}

public void OnEndDrag(PointerEventData eventData)
{
    // 当结束事件时,检测当前是否碰撞到我们需要的slotUI内容
    inventoryUI.dragImg.enabled = false;
    Debug.Log(eventData.pointerCurrentRaycast);
}
|
其中eventData.pointerCurrentRaycast用于显示我释放鼠标时,碰撞的物体
此处碰撞物体会与TMP的内容相碰撞,因此需要将所有TMP和图标都设置为无法被光线检测,因此需要修改预制体
注意tmp的raycast target在 extra Setting中,并且要点击扩展折叠打开
实现物体拖拽后位置交换与丢到地面
由于每个slot都有对应的序号,因此我们可以通过交换后,修改playerBag(dataSo)里对应需要对应的物品就行。
实现物体拖拽后位置交换
- 由于定义了拖拽结束函数,因此需要在该函数中判断拖拽的目标是某个UI还是地面(null)
- 然后将交换分为三类,分别是玩家背包之间的交换,玩家与仓库交换,玩家与商店交换
- 最后由于一定要操作背包的数据,因此在
inventoryManager.cs定义交换函数,并将数据进行交换后使用更新UI事件
 1
 2
 3
 4
 5
 6
 7
 8
 9
10
11
12
13
14
|
// slotUI.cs

// 当结束事件时,检测当前是否碰撞到我们需要的slotUI内容
inventoryUI.dragImg.enabled = false;
// 获取交换目标
var target = eventData.pointerCurrentRaycast.gameObject;
// 判断目标是地面还是某个UI(玩家背包,或者仓库,或者商店
if (target != null){
    // 分为玩家背包之间的交换,玩家与仓库交换,玩家与商店交换
    if (slotType == SlotType.Bag && targetSlot.slotType == SlotType.Bag)
    {
        InventoryManager.Instance.SwapPlayerBagItem(slotIndex, targetSlot.slotIndex);
    }
}
|
 1
 2
 3
 4
 5
 6
 7
 8
 9
10
11
12
13
14
15
16
17
18
19
20
21
22
|
// inventoryManager.cs
public void SwapPlayerBagItem(int currentIndex, int targetIndex)
{
    var currentItem = playerBag.inventoryItemList[currentIndex];
    var targetItem = playerBag.inventoryItemList[targetIndex];

    // 判断目标位置是否有内容
    if (targetItem.itemAmount == 0)
    {
        playerBag.inventoryItemList[targetIndex] = currentItem;
        playerBag.inventoryItemList[currentIndex] = new InventoryItem();        // 在C#中结构体内部的数值直接会被初始化为0
    }
    else
    {
        playerBag.inventoryItemList[targetIndex] = currentItem;
        playerBag.inventoryItemList[currentIndex] = targetItem;
    }

    // 更新UI内容
    EventHandler.CallUpdateInventoryUI(InventoryLocation.Player, playerBag.inventoryItemList);

}
|
将物品拖拽到地面
将物体拖 景也可生成的,因此需要一个专门的Manager来管理这些在地面上生成的物体。
- 首先需要将屏幕坐标转化为世界坐标
Camera.main.ScreenToWorldPoint(Vector3)
- 定义一个事件,专门用于通知itemManager需要在当前位置生成一个物体
- 使用
ItemManager来管理地面上的物体,因此itemManger用于声明事件的执行过程
 1
 2
 3
 4
 5
 6
 7
 8
 9
10
11
12
13
14
15
|
// slotUI.cs
else  // 如果是地面
{
    if (slotItemDetails.canDropped)
    {

        // 在2d游戏中z轴默认是-10,而将转化为世界坐标需要将其取消掉
        var dropPos = Camera.main.ScreenToWorldPoint(new Vector3(Input.mousePosition.x,
                                                                 Input.mousePosition.y, -Camera.main.transform.position.z));
        // 生成item
        EventHandler.CallInstantiateItemInScene(slotItemDetails.itemID, dropPos);


    }
}
|
1
2
3
4
5
6
|
// EventHandler.cs
public static event Action<int, Vector3> InstantiateItemInScene;
public static void CallInstantiateItemInScene(int ID, Vector3 pos)
{
    InstantiateItemInScene?.Invoke(ID, pos);
}
|
该manager用于注册和声明预制体的生成的方法,而具体的激活预制体生成,则通过调用action事件来使用。也就是说manager只是用于提供预制体生成的函数,并保证该函数能被事件中心获取,而预制体的生成将用逻辑函数在具体的功能中激发事件中心来实现。
其中itemParent用于保证生成的item在Unity的层次窗口中不会过于混乱,生成的所有item都会以itemParent为父物体
 1
 2
 3
 4
 5
 6
 7
 8
 9
10
11
12
13
14
15
16
17
18
19
20
21
22
23
24
25
26
27
28
29
30
31
32
33
|
// itemManager.cs
public class ItemManager : MonoBehaviour
{
    public Item itemPrefab;

    private GameObject _itemParent;

    private void Start()
    {
        _itemParent = GameObject.FindGameObjectWithTag("ItemParent");
    }

    private void OnEnable()
    {
        EventHandler.InstantiateItemInScene += OnInstantiateItemInScene;
    }

    private void OnDisable()
    {
        EventHandler.InstantiateItemInScene -= OnInstantiateItemInScene;
    }

    /// <summary>
    /// 在当前场景中生成目标item
    /// </summary>
    /// <param name="ID">item的ID</param>
    /// <param name="pos">item的对应位置</param>
    private void OnInstantiateItemInScene(int ID, Vector3 pos)
    {
        var item = Instantiate(itemPrefab, pos, Quaternion.identity, _itemParent.transform);
        item.itemID = ID;
    }
}
|
制作一个单独的ItemToolTip窗口,窗口背景图片是一个Image,然后再内部添加内容
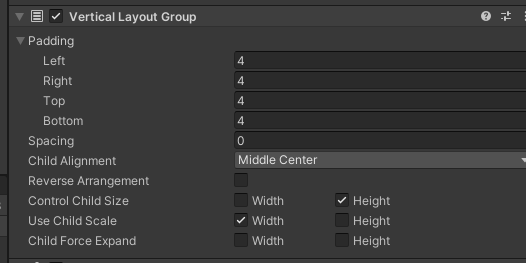
由于内容涉及到多行,因此为该主体parent添加组件Vertical Layout Group用于控制每个子物体的宽度和长度
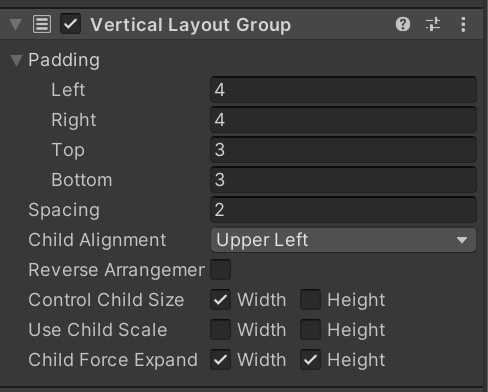
注意:只要内部有子物体,且每个子物体的大小都需要被控制的话,就需要添加该组件
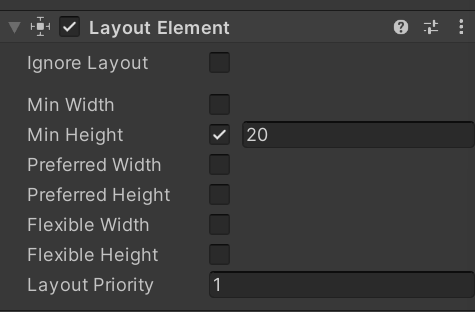
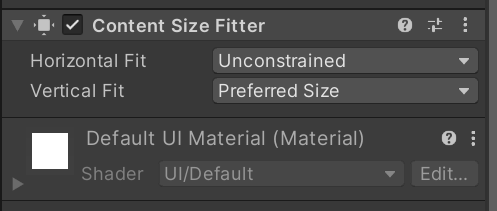
同时也为了保证窗口能一直保持合适的大小,需要添加组件Content Size Filter,对垂直或水平方向设置自动拓展。
然后使用Layout Element组件可以指定最小的宽度和高度
如果要保证孩子宽度一定,但是高度自由控制,则需要如下方式处理
该部分代码的实现思路是:
- 为
Item Tooltip直接挂载对应的脚本ItemTooltip.cs, 并使用脚本获得该GO下的所有部分的控制权
- 设置一个方法,该方法需要获得物品信息,将
Item ToolTip与当前的数据进行绑定,并进行显示。
- 由于
InventoryUI是用于显示所有背包栏等数据的显示的管理页面,因此此处需要设置Item Tooltip的变量,并将我们设置号的GO挂载到该变量上
- 为了将
SlotUI和我们显示Item Tooltip信息相分割,因此需要设置不同的脚本
- 在新的脚本
showItemDetails中获取InventoryUI中挂载的Item Tooltip的变量,当鼠标移动到SlotUI上时,从InventoryUI的Item Tooltip的变量启动我们的设置函数,然后显示对应的窗体
- 修改窗体显示方式,设置快速渲染,保证每次窗体的显示不会有延迟
具体实现:
- 实现
itemTooltipGO的数据控制,以及编写绑定函数
同时为了保证不会延迟渲染,因此要通过代码实现更新details后就直接渲染
 1
 2
 3
 4
 5
 6
 7
 8
 9
10
11
12
13
14
15
16
17
18
19
20
21
22
23
24
25
26
27
28
29
30
31
32
33
34
35
36
37
38
39
40
41
42
43
44
45
46
47
48
49
50
51
52
53
54
55
56
57
58
59
60
61
62
63
|
public class ItemTooltip : MonoBehaviour
    {
        /* 获取ItemTooltip GO的所有内容的控制权 */
        [SerializeField] private TextMeshProUGUI nameText;
        [SerializeField] private TextMeshProUGUI typeText;
        [SerializeField] private TextMeshProUGUI descriptionText;
        [SerializeField] private Text priceText;
        [SerializeField] private GameObject bottomPart;


        /// <summary>
        /// 为itemTooltip窗体设置需要显示的内容
        /// </summary>
        /// <param name="details">具体信息</param>
        /// <param name="itemType">鼠标当前选取的窗体的类别(区别商店和玩家背包)</param>
        public void SetupTooltips(ItemDetails details, SlotType slotType)
        {
            nameText.text = details.itemName;
            typeText.text = getItemType(details.itemType);
            descriptionText.text = details.itemInfo;

            if (details.itemType == ItemType.Seed || details.itemType == ItemType.Commodity || details.itemType == ItemType.Furniture)
            {
                bottomPart.SetActive(true);
                int showPrice = details.itemPrice;

                if (slotType == SlotType.Bag || slotType == SlotType.Box)
                {
                    showPrice = (int)(showPrice * details.sellPercentage);

                }
                priceText.text = showPrice.ToString();
            }
            else
            {
                bottomPart.SetActive(false);
            }
            			           LayoutRebuilder.ForceRebuildLayoutImmediate(GetComponent<RectTransform>());

        }

        /// <summary>
        ///  转化类型名称
        /// </summary>
        /// <param name="detailsItemType"></param>
        /// <returns></returns>
        private string getItemType(ItemType detailsItemType)
        {
            // 语法糖
            return detailsItemType switch
            {
                ItemType.Seed => "种子",
                ItemType.Commodity => "商品",
                ItemType.Furniture => "家具",
                ItemType.BreakTool => "工具",
                ItemType.CollectTool => "工具",
                ItemType.ChopTool => "工具",
                ItemType.HoeTool => "工具",
                ItemType.ReapTool => "工具",
                ItemType.WaterTool => "工具",
                _ => "其他"
            };
        }
|
由于一定需要SlotUI对应的按钮上因此需要[RequireComponent(typeof(SlotUI))]
 1
 2
 3
 4
 5
 6
 7
 8
 9
10
11
12
13
14
15
16
17
18
19
20
21
22
23
24
25
26
27
28
29
30
|
[RequireComponent(typeof(SlotUI))]
public class ShowItemDetails : MonoBehaviour, IPointerEnterHandler, IPointerExitHandler
{
    private SlotUI _slotUI;
    private InventoryUI InventoryUI => GetComponentInParent<InventoryUI>();

    private void Awake()
    {
        _slotUI = GetComponent<SlotUI>();
    }

    public void OnPointerEnter(PointerEventData eventData)
    {

        if (_slotUI.itemAmount != 0)
        {
            InventoryUI.itemTooltip.gameObject.SetActive(true);
            InventoryUI.itemTooltip.SetupTooltips(_slotUI.slotItemDetails, _slotUI.slotType);
        }
        else
        {
            InventoryUI.itemTooltip.gameObject.SetActive(false);
        }
    }

    public void OnPointerExit(PointerEventData eventData)
    {
        InventoryUI.itemTooltip.gameObject.SetActive(false);
    }
}
|
设置最小尺寸的组件Layout Element